

Guided options
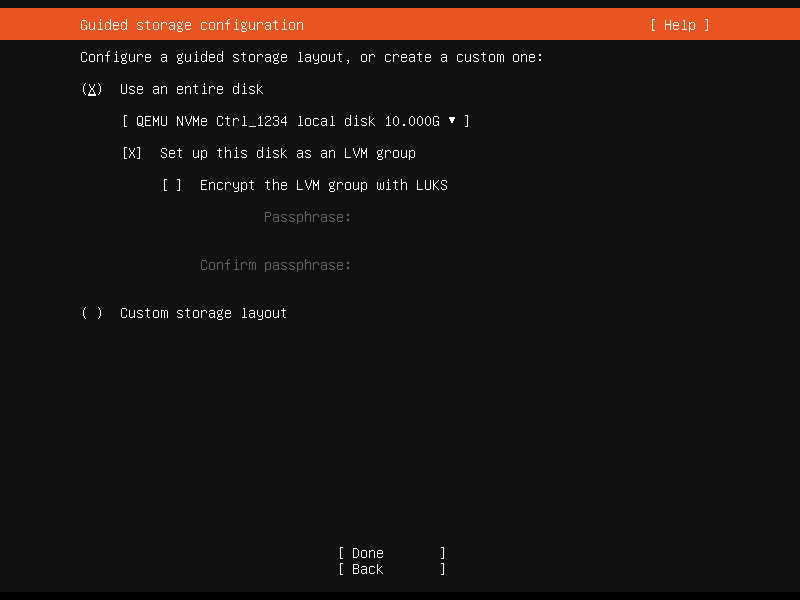
Selecting “Use an entire disk” on the Guided storage configuration screen will install Ubuntu onto the selected disk, replacing any partitions or data already there. You can choose whether or not to set up LVM, and if you do, whether or not to encrypt the volume with LUKS. If you encrypt the volume, you need to choose a passphrase that will need to be entered each time the system boots. If you select “Custom storage layout”, no configuration will be applied to the disks. In either case, the installer moves onto the main storage customisation screen.
The main storage screen

This screen presents a summary of the current storage configuration. Each device or partition of a device corresponds to a different row (which can be selected), and pressing Enter or space while a device is selected opens a menu of actions that apply to that device.
Partitions

To add a partition to a device, select “Add GPT Partition” for that device.

You can leave “Size” blank to use all the remaining space on the device.
RAID
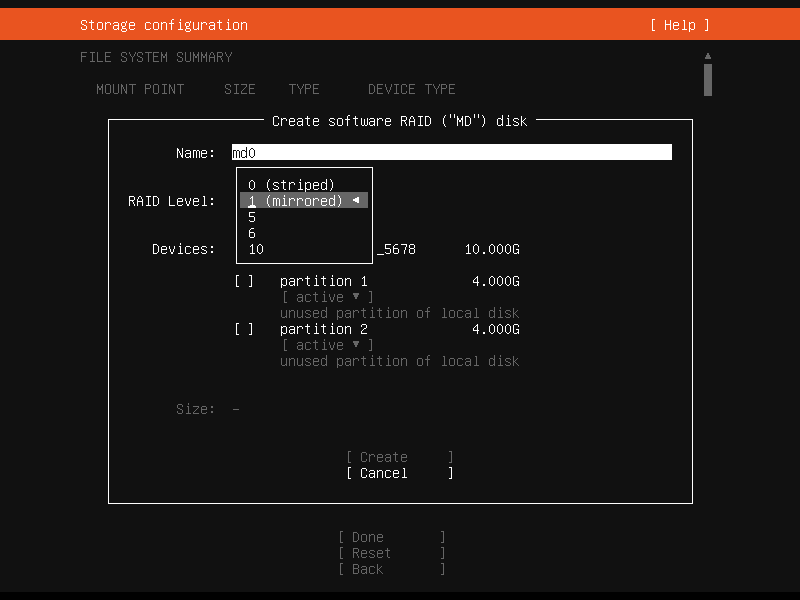
Linux software RAID (RAID stands for “Redundant Array of Inexpensive Disks”) can be used to combine several disks into a single device that is (usually) tolerant to any one disk failure. A software RAID device can be created out of entire disks or unformatted partitions. Select the “Create software RAID (“MD”)” button to open the creation dialog. The server installer supports creating devices with RAID level 0, 1, 5, 6 or 10. It does not allow customizing other options such as metadata format or RAID10 layout at this time. See the Linux RAID documentation for more details. A software RAID device can be formatted and mounted directly, can be partitioned into several partitions, or even be used as part of another RAID device or LVM volume group.
RAID Documentation:
https://raid.wiki.kernel.org/index.php/Linux_Raid
Logical Volume Manager (LVM)

The LVM is a system of managing logical volumes, or filesystems, that is much more advanced and flexible than the traditional method of partitioning a disk into one or more segments and formatting that partition with a filesystem. It can be used to combine several disks into one larger pool of storage but it offers advantages even in a single disk system, such as snapshots and easy resizing of logical volumes. As with RAID, a LVM volume group can be created out of entire disks or unformatted partitions. Select the “Create LVM volume group” button to open the creation dialog. Once a volume group has been created, it can be divided into named logical volumes which can then be formatted and mounted. It generally makes sense to leave some space in the volume group for storage of snapshots and creation of more logical volumes as needed. The server installer does not supported configuring any of the many, many options that LVM supports when creating volume groups and logical volumes.
Selecting boot devices

On all architectures other than s390x, the bootloader needs to be installed to a disk in such a way that the system firmware can find it on boot. By default, the first device to have a partition created on it is selected as a boot device but this can be changed later. On amd64 and arm64 systems, multiple disks can be selected as boot devices, which means a system can be configured so that it will continue to boot after a failure of any one drive (assuming the root filesystem is placed on a RAID). The bootloader will be installed to each of these drives, and the operating system configured to install new versions of GRUB to each drive as it is updated. amd64 systems use GRUB as the bootloader. amd64 systems can boot in either UEFI or legacy (sometimes called “BIOS”) mode (many systems can be configured to boot in either mode) and the bootloader is located completely differently in the two modes. In legacy mode, the bootloader is read from the first “sector” of a hard drive (exactly which hard drive is up to the system firmware, which can usually be configured in a vendor-specific way). The installer will write GRUB to the start of all disks selected as a boot devices. As GRUB does not entirely fit in one sector, a small unformatted partition is needed at the start of the disk, which will automatically be created when a disk is selected as a boot device (a disk with an existing GPT partition table can only be used as a boot device if it has this partition). In UEFI mode, the bootloader loaded from a “EFI System Partition” (ESP), which is a partition with a particular type GUID. The installer automatically creates a 512MiB ESP on a disk when it is selected as a boot device and will install GRUB there (a disk with an existing partition table can only be used as a boot device if it has an ESP – bootloaders for multiple operating systems can be installed into a single ESP). UEFI defines a standard way to configure the way in which the operating system is chosen on boot, and the installer uses this to configure the system to boot the just-installed operating system. One of the ESPs must be mounted at /boot/efi. Supported arm64 servers boot using UEFI, and are configured the same way as an UEFI-booting amd64 system. ppc64el systems also load their bootloader (Petitboot, a small linux kernel) from a “PReP” partition with a special flag, so in most ways they are similar to a UEFI system. The installer only supports one PReP partition at this time.
Attach your Ubuntu Pro subscription
Attaching the Ubuntu Pro subscription to Ubuntu brings you the enterprise lifecycle, including Linux kernel livepatching, access to FIPS-validated packages, and compliance with security profiles such as CIS. This is not required for Ubuntu Pro instances through public clouds such as AWS, Azure or GCP, since these are automatically attached from launch.
Step 1: Install the Ubuntu Pro Client
This step is necessary for Ubuntu Pro users or holders of personal subscriptions. If you are an Ubuntu Pro user through a public cloud offering, your subscription is already attached and you may skip these instructions. We first need to make sure that we have the latest version of the Ubuntu Pro Client running. The package used to access the Pro Client (pro) is ubuntu-advantage-tools:
sudo apt update
sudo apt install ubuntu-advantage-tools
If you already have ubuntu-advantage-tools installed, this install command will upgrade the package to the latest version.
Step 2: Attach your subscription
Once you have the latest version of the Pro Client installed, you need to attach the Ubuntu Pro token to your Pro Client to gain access to the services provided under Ubuntu Pro. First you need to retrieve your Ubuntu Pro token from the Ubuntu Pro dashboard. To access your dashboard, you need an Ubuntu One account. If you still need to create one, be sure to sign up using the email address used to create your subscription. The Ubuntu One account functions as a single-sign-on (SSO), so once logged in we can go straight to the Ubuntu Pro dashboard at ubuntu.com/pro. Then click on the ‘Machines’ column in the ‘Your Paid Subscriptions’ table to reveal your token. Now we’re ready to attach our Ubuntu Pro token to the Pro Client:
sudo pro attach <your_pro_token>
Ubuntu pro dashboard:
Ubuntu one account:
You will know that the token has been successfully attached when you see the list of services, descriptions and their enabled/disabled status in a table similar to this:
SERVICE          ENTITLED  STATUS    DESCRIPTION
esm-apps         yes       enabled   Expanded Security Maintenance for Applications
esm-infra        yes       enabled   Expanded Security Maintenance for Infrastructure
livepatch        yes       enabled   Canonical Livepatch service
realtime-kernel  yes       disabled  Ubuntu kernel with PREEMPT_RT patches integrated
Note that Extended Security Maintenance (ESM) and Livepatch will auto-enable once your token has been attached to your machine. After attaching the Pro Client with your token you can also use the Pro Client to activate most of the Ubuntu Pro services, including Livepatch, FIPS, and the CIS Benchmark tool.